Purpose
Our proprietary Savy Schedule is designed to meet the unique needs of different tax practices. It empowers you to create fully custom schedules without the need to toggle between Tax Savy and spreadsheets.
🏷️ Tagging & Creating Savy Schedules
There are two ways to create a Savy Schedule, depending on how it's being used:
1. Dependent Savy Schedule
- In the Detailed P&L, Breakdown schedule, select Savy Schedule the tax adjustments options
- Tag the line and create new schedule

Key Difference: A reference will be created from source (e.g. Detailed P&L or Breakdown Schedules) to the Savy Schedule for easy traceability.
2. Independent Savy Schedule
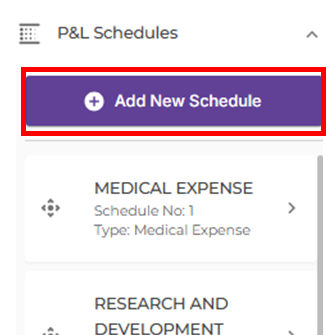
- On the left panel, click P&L Schedules to expand list
- Select on Add New Schedule
- Choose Savy Schedule from the list

⚙️ How to Use Savy Schedules
Each Savy Schedule has two key sections:
Main Comp Adjustment (Top section):
This is where you define how the schedule interacts with the Main Comp.
- Schedule Name: The label that appears in the Main Comp
- Name: Description of the line; no impact on Main Comp
- Amount: Input the net adjustment amount to apply
- Tax adjustment: Choose whether it is an Add Back or Deduct
- Section: Select where the amount should flow in the Main Comp:
- Tax Adjustments
- Further Deductions
- Other Income (e.g. accumulated and unremitted foreign-sourced income)
- Current Year CAs (e.g. group relief or carry back relief)
- Current Year Losses
- Current Year Donations
- Tax Deductions (e.g. foreign tax credits)
Spreadsheet Section (Bottom section):
Here’s where the customization magic happen
- Add a header for your schedule
- Build and format your schedule like a mini spreadsheet—tailored to your review and documentation needs
Note: The amount calculated in the spreadsheet is not linked to Amount field in the top section. Be sure to update the adjustment amount in the Main Comp Adjustment section.